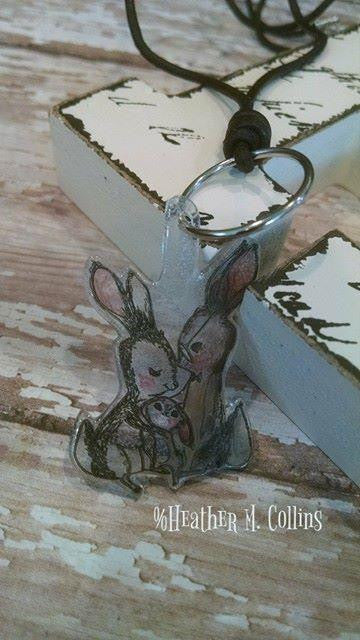
Bunny Love Shrinky Dinks- Heather Collins
(Flash Back to 2017)
I used to love doing ‘Shrinky Dinks’ as a child. Now that I have children I thought this would be a cute project for us to do while they were on Spring Break from school. Plus we could give them out as gifts.

First I started by cutting the shrinky dinks in half using scissors. I got the shrinky dinks at a local craft store, the clear version is what I went with, there are three to choose from. It wouldn’t cut using a paper cutter, so I just used some good strong scissors. Next I placed the shrinky dink half in my MISTI and only had to stamp once using the Brutus Monroe black Detail ink. Three were able to fit on half of a sheet. I zapped for a few seconds with my heat gun to set the ink.
I prefilled a water pen with rubbing alcohol. There are three bunnies on the Brutus Monroe ‘Bunny Kisses’ stamp. Smearing the ‘rouge’ surface ink on an art mat works best as an art palette for this project. I applied this color on all three bunnies' inner ears. The smallest bunny I used ‘suede’ surface ink. On the male looking bunny (the far right hand side) I used a mixture of ‘macchiato’ and ‘suede’ surface inks. Sometimes I mixed the colors on the art mat and sometimes I just used one color or the other. The female bunny (the far left hand side) I left clear. I also applied some ‘rouge’ surface ink on their cheeks, to give them a healthy, happy look. The main difference I found using alcohol rather than water in the brush is that you had to use shorter strokes and it dried more quickly than water. One has to use an alcohol based product on the shrinky dinks or they don’t work. Once that was completed I once again zapped for a few seconds with my heat gun.


Taking a hole puncher I punched one hole above the group of bunnies. One must do this before the items go in the oven. I trimmed around the whole image including an area that left some room around the hole I punched. Leave a little space around the bunny grouping and punch- it will look better visually.

I have a little toaster oven that I bought on sale. I had read that it is the safer way of ‘cooking’ plastic like things. I put aluminum foil on the little tray and placed my bunnies on it. According to the package I got I set the toaster oven for 325 degrees and for 3 minutes. If they start to curl after done or not lay flat, have a spatula to push down while still hot. They will cool pretty quickly after coming out. I had a pre-made black leather necklace that I looped my shrinky dink bunnies on.

This turned into a pretty simple and easy gift. Not only did my kids and I enjoy making them, but we enjoyed handing them out and wearing them.

SUPPLIES USED:
Brutus Monroe “Bunny Kisses” stamp
Rouge Surface Ink
Macchiato Surface Ink
Suede Surface Ink
Brutus Monroe Squeaky Clean Cleaner
Brutus Monroe Microfiber Stamp Cloth
heat gun
MISTI
Scissors
Shrinky Dinks
Ranger Craft Mat
Alcohol
Water Pen
Premade Necklace
Hole Punch
Toaster Oven

Comments
Leave a comment