


Alley Cat and the Other 20 New Stamp Sets
Well, hey there! Daniel here, writing to you as the B|M Inspiration Team wraps up 24 hours of crafting to celebrate the June 2019 release of 21 new stamp sets and 5 paper packs! What a wild ride of card making the last several hours have been. The whole team has show up with great inspiration for these stamps. I hope you have shopped for yours already. I can't wait to see what everyone makes with these products. I KNOW you will rock them out!
Yesterday, during my lives, I created several cards, two of which I will show off here!
The first card, I created using the Tree of Thanks stamp set. Its a weeping willow type tree with a swing. The set includes lots of stamps to show gratitude.

For my first card, I stamped the tree image onto three different colors of A2-sized cardstock: green, gray and white. On the colored cardstock, I used Raven Detail Ink and on the white cardstock, I used Sage Surface Ink.
I loosely colored in the leaves of the tree with a green Arteza Real Brush Pen. Then, I colored in the trunk and branches with gray. I trimmed the white panel down to take off some of the tree. Then I did the same with the gray panel, only I left a little more of the tree. And I adhered the white panel to the gray panel, carefully lining up the tree image. Then, I repeated this step adding the gray and white panels over the green panel.
For the sentiment, I heat embossed the "thank you" sentiment onto some Heat Resistant Vellum using Raven Embossing Powder. Then, I fussy cut it out and adhered it to the front of the panel. Finally, I glued it all to the front of an A2-sized white card base.

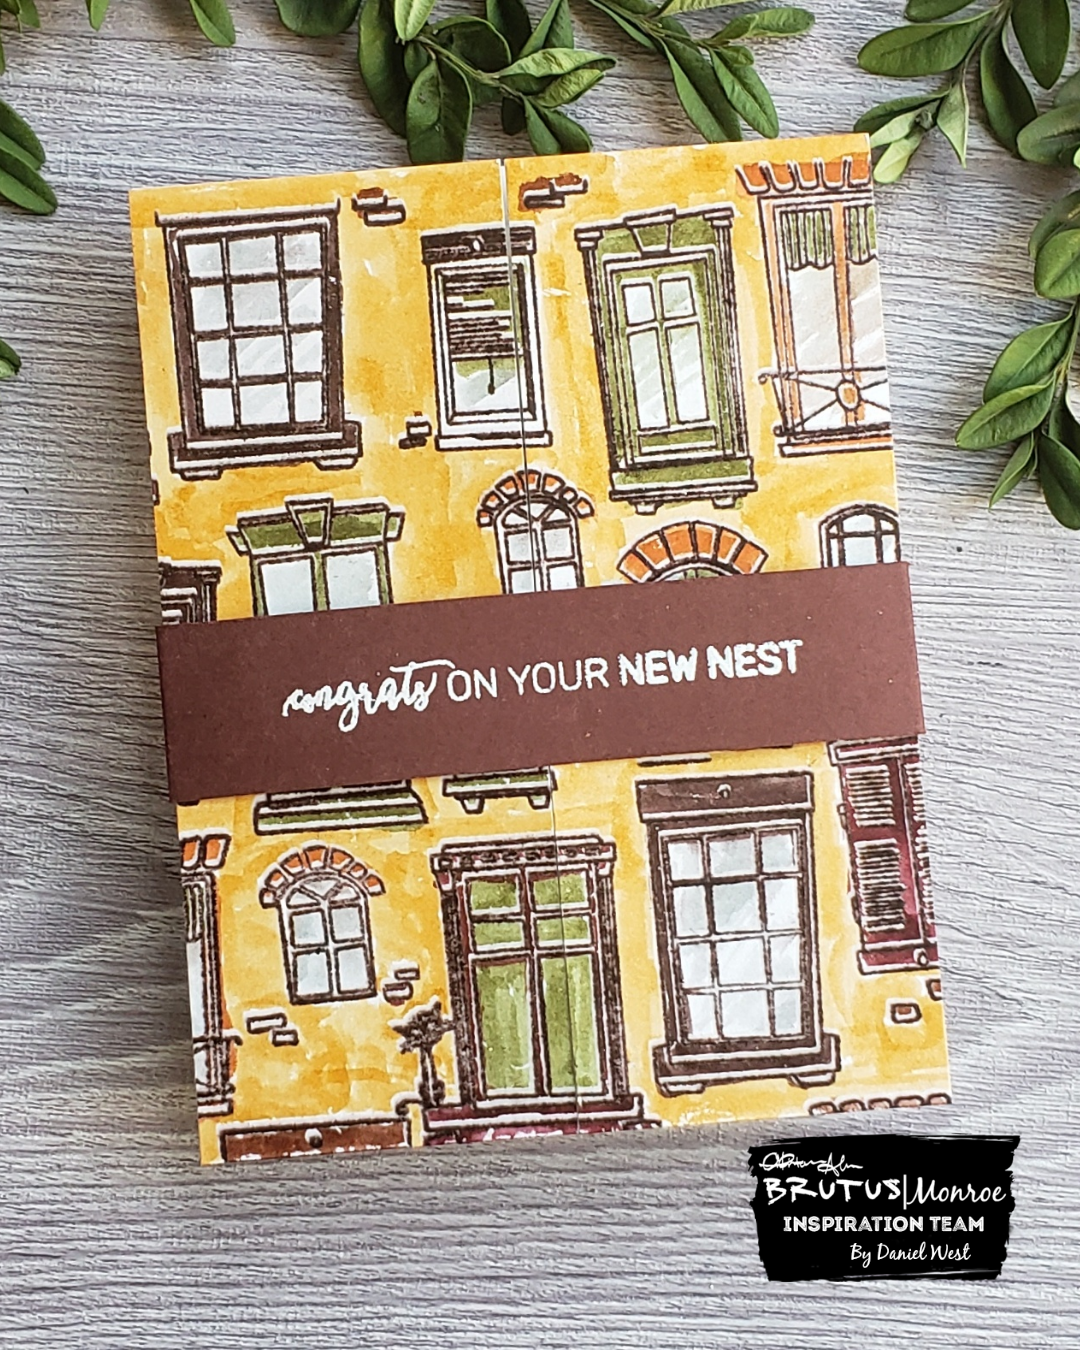
For the second card, I used the Alley Cat Background Stamp, named for a little kitty at the bottom of the stamp. This wonky and sketchy stamp had me thinking of a beautiful Tuscan village with narrow streets and alleyways. So, I decided to stamp it out in Maple Surface Ink and add Icicle Embossing over the entire front. I chose some earthy colors of Arteza Real Brush Pens for my palette and colored them in. Notice my clear embossing powder was off by a millimeter and it resists the water color, leaving this offset effect, I really like.
After coloring in the image, i trimmed it down to an A2-sized panel and split it down the middle. I created a gatefold card base by scoring a 5 1/2" x 8 1/2" piece of card stock at 2 1/8" and 6 3/8". Then, I adhered the split panel pieces to the front of the card base with double-sided adhesive.

I wanted a belly band to go around the gatefold to keep it closed. So I grabbed a wine-colored piece of cardstock and cut it down to 10' x 2". I scored it just a bit larger than the gatefold card and adhered one end to the back with some double-sided adhesive. I stamped a sentiment from the Feathered Friends Stamp Set that says, "Congrats on your new nest!" and heat embossed it with Alabaster Embossing Powder.

It fits perfectly and will be mailed out this morning to my friend and fellow Inspiration Team member, Jessica. She just moved to a new house with her family! How exciting is that!!
You can find both of the live videos where I made these cards on the Brutus Monroe Facebook page here. And below is a grid of supplies that include my affiliate links. Thank you for using affiliate links when you make your purchases and thanks again for joining me today.
Comments
Leave a comment