


Steampunk Canvas
Hello friends! Vicki here and I'm so excited to be sharing my first post with you here as a new inspiration design team member for Brutus Monroe! I think you may have been seeing me pop in to share a few creations on the Brutus Monroe Fan Club Group on FB. I've been a "fan" for a while too so you might have seen me around before here and there, so it's kind of sureal to be here right now actually!
What I enjoy is the versatility of stamps and products to play around with...so whatever is your style, I know it can found at Brutus Monroe! My problem is I love E-V-E-R-Y-T-H-I-N-G and so you will see a variety of different projects from me. The first time that I saw the "Steampunk" products that Christopher was showing, I fell in love and had a few ideas in mind. So this was a really fun project to work on and just play around with everything I had:

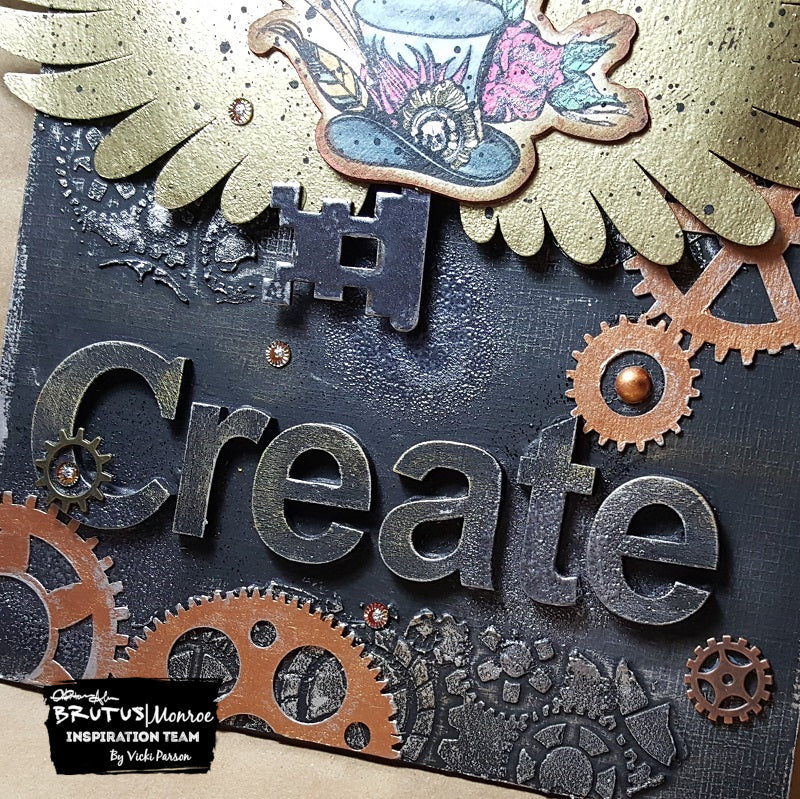
I create cards all the time, so it was fun to do something different this time! I had an old 8"x10" canvas laying around unused and decided to paint it up for a fun mixed media project that I could hang up in my craft room somewhere!
I started out by gluing the wooden letters "create" at the bottom as well as taking the BM Stencil of the Month and adding embossing paste randomly over the canvas. I then painted the entire canvas with black gesso.
Using silver, gold and copper metallic paints, I used my "finger tool" to rub along the raise areas and edges of the canvas. I also painted the portions of the Chipboard Gear Background pieces that I had cut out. (I think I may have cried a little when I cut into it...but it's all good!) Those pieces were attached randomly over the canvas as well. I even took the "gold pearls" from the Inspiration Box this month and painted those!

What was hard to photograph was all of that awesome sparkle from the embossing powder (also from Inspiration Box) that I covered with the Chipboard Wings! It is really quite impressive! I also covered the Chipboard Key with some of the EPOTM Gadgets and Gizmos. I went along the edges of the key with some silver metallic so that it stood out a bit from the black background.
For the image...love that hat image so much and I was dying to use it! (from the Steampunk stamp set) I stamped it out with the Raven Detail Ink over Alabaster Cardstock that was pre-cut with the Steampunk Digital Cut File. I colored it up using various Aqua Pigments and then sponged around it with some brown ink. I splattered both this image and the embossed wings with some black paint. I then popped up the wings over the canvas and attached them with some black foam tape and curved out the end of the wings sticking over the edges. I added the embossed key over top of the wings and then the hat image.

The same embossing powder that I used for the key (EPOTM-Gadgets and Gizmos), I also used it randomly on the painted canvas by spraying the canvas with water (something for it to stick to) and then heat set it in and then added more over it. I thought it was just another cool texture to add to it.

I finished up my canvas by adding a ribbon bow to the top of the key, some metal gears and sequins (all from this month's Inspiration Box) as well as a gear in the center of the bow and a clock button from my own stash (painted) and attached to the canvas. I also put a bit of silver glitter in the center of the sequins.
This was so different and fun to create! All of the Steampunk products were perfect to use for a little mixed media fun!
Thanks for joining me this weekend! I will see you again next time! Be sure to catch me on my blog for more inspiration - Stamped Smiles
Leave a comment