


Glitter Glaze Ombre Love You More
Hello crafty friends! Lauren here, sharing my last official blog post as part of the Inspiration Team! I'll be moving on after this week, but I'm very excited to see who will be on the brand new design teams for Brutus Monroe. There have been some super cool projects popping up on social media, and I can't wait to see who gets chosen for the new teams!

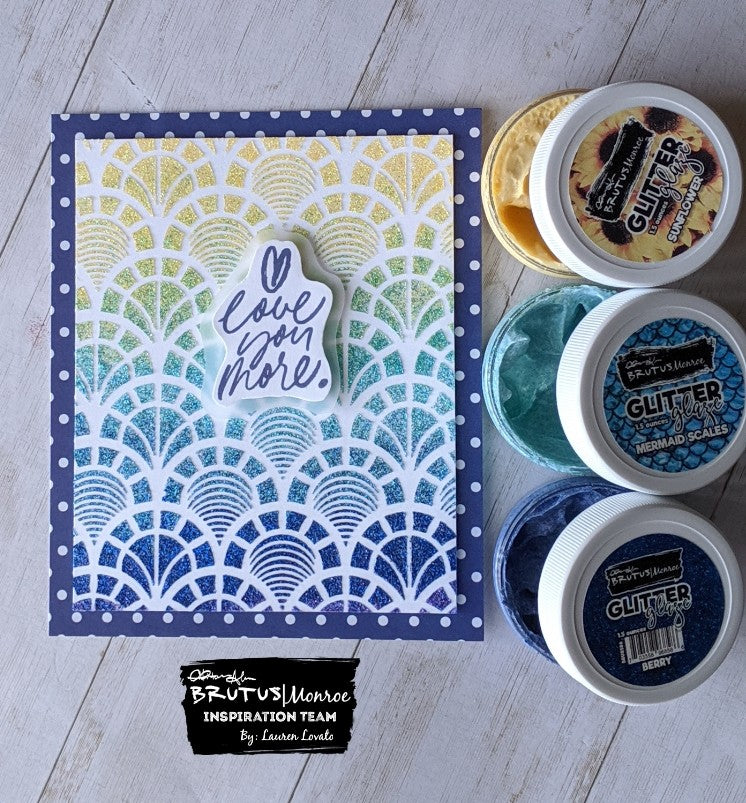
When I first started on the inspiration team, I was obsessed with the glitter glazes. Although the metallic embossing powders were my first Brutus Monroe loves, it's been the glitter glaze that has been my favorite during this past year. There have been some gorgeous colors and I will definitely keep up my stencil and glitter glaze subscriptions! If you've followed my social media at all, you'll know that I love a good glitter ombre, so it's only right that I end my time on the team with one last glitter glaze ombre card!

I used "Wallpaper" stencil, and the glitter glaze colors Sunflower, Mermaid Scales, Berry, and Perfect Plum for this background. I taped a piece of cardstock that was 4.75 x 6 inches onto the back of the stencil with purple tape. I lined the colors up in the order that I was going to use them, and then took a small scoop of each color to mix into a transition color. For example, since Sunflower and Mermaid Scales were going to be overlapping, I mixed a small amount of them together to make a nice gradual fade to the next color. I also mixed Mermaid Scales and Berry, and Berry and Perfect Plum. So when I went to stencil the colors, this is the order that I spread the colors:
Sunflower, Sunflower/Mermaid Scale mix, Mermaid Scale, Mermaid Scale/Berry mix, Berry, Berry/Perfect Plum mix, Perfect Plum.
You definitely don't need to do the mixing step, but for this card I wanted the smooth fade between colors.
I peeled up the stencil and set the background aside to dry. I stamped the sentiment onto a piece of Alabaster cardstock with Lapis surface ink and fussy cut around it with scissors. I used foam tape to adhere it to a piece of vellum, and then fussy cut again, leaving a border of vellum around the sentiment. I popped it up on the card from with another layer of foam tape, and then adhered the glitter glaze panel to a piece of dark blue polka dot cardstock.

Have you tried the glitter glazes from Brutus Monroe yet? If not, what are you waiting for! Go check them out! Post your projects to social media, and be sure to use the hashtags #BrutusMonroe and #CreateYourOwnEnding so we can see what you make. Thank you to the amazing staff and Brutus Monroe for the amazing support and opportunities during my time on the team, and to the fabulous Brutus fans that have always shown me so much love!
SUPPLIES (affiliate links are used):
Comments
Leave a comment