Brutus Bucks Program
Check your Rewards Here!
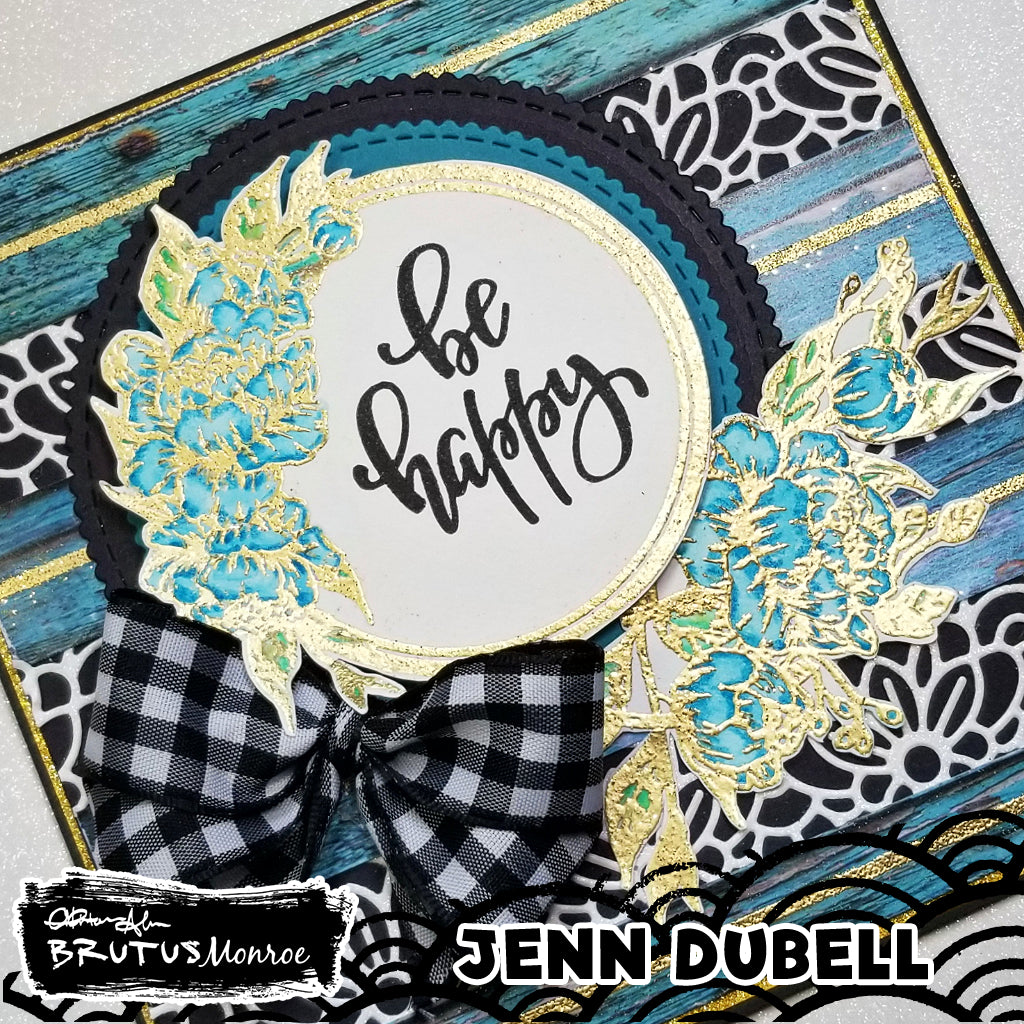

Hello everyone! Jenn here today sharing a fun card I created this week using lots of great Brutus Monroe products. The idea to cut the Weathered Wood Papers and pair them with the Lace Border Dies came to me when I was thinking of what I could do that was outside of a clean and simple card.
This is a flip open style card created on a black base measuring 6 X 6.
The following Brutus Monroe Products were used:
Weathered Wood 6X6 Paper Pad
Lace Borders Die Set
Raven Detail Ink
Bee You 4x6 Stamp Set
Embossing Powder - Gilded Sparkle
Aqua Pigment Turquoise
Aqua Pigment Green
Embossing Ink
Other supplies:
Adhesive
Heat Tool
Black and White Gingham Ribbon
Scalloped Circle Dies
Score Tape
Water Brush
Black and Teal Cardstock
Golden Glitter Cardstock
White Glitter Cardstock
To create the card front panel:
Cut a sheet of the Weathered Wood paper in choice of color into strips about 1" wide by 5 1/2". I did mine in different widths rather than all being 1" as well.
Die Cut one of the lace border dies 3 times. For this I used a white glittery cardstock but you can do this in what works for your color palette.
Next I cut a sheet of black cardstock to 5 1/2" X 5 1/2" and adhered the lace borders across it leaving room in between each. Next I layered the wood paper strips in the in between spaces on top of the lace die cuts.
A piece of gold glitter cardstock was cut as a matte to adhere this to that is just a bit larger to show a hint of the gold underneath.
The Flowers from the Bee you stamp set were stamped in embossing ink and coated in the gilded sparkle embossing powder and set with the heat tool.
Once the embossing powder was set and dry I used green and turquoise Aqua Pigments to color them, fussy cut them and set them aside. While ink dried I cut two scalloped circles using a die set from my stash. One in black and one in a coordinating teal color.
Finally the card was assembled by adhering the scalloped circles together and then onto the card front, followed by the fussy cut floral circle with stamped sentiment.(This was adhered with foam to add dimension). The other floral spray was adhered directly to the surface and a cute gingham bow was added!
Before I assembled i decide to add a bit more of the beautiful gold sparkle embossing powder by drawing lines in the middle of each wood strip using an embossing pen.

Thanks so much for visiting the blog and viewing my post today! As always have an amazing crafty day!
Jenn
| Item | Price | Qty | Total | |
|---|---|---|---|---|
| Subtotal |
$ 0.00 |
|||
| Shipping | ||||
| Total | ||||
Leave a comment