
Brutus Bucks Program
Check your Rewards Here!
Hello friends! Shannon here to give you my first impressions and a few tips on using Karin markers.
First off, I want to let you know that a lot of the info this post includes I got from the brochure that conveniently came with the markers.
Karin markers are either dye based or as in the case of the neon colors, are pigment based. These react beautifully with water and also work amazingly well with the blender pens (which contain a blending solution).
I tried using the four suggested ways from the brochure:
I found these markers very user friendly and I love that I can get a watercolor look with a bit more control.
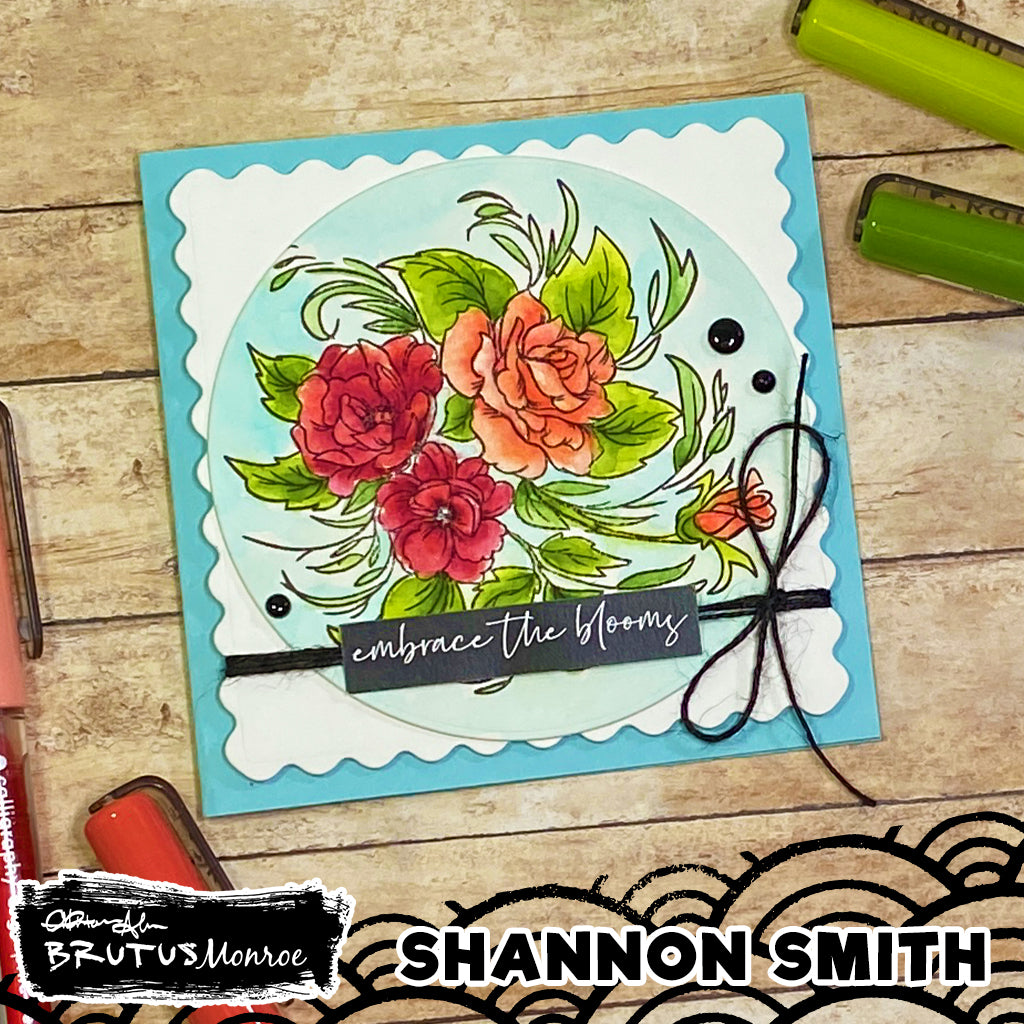
For this card I used the Floral Sentiments stamp set. I stamped it with Raven ink onto watercolor paper. Aqua Pigment paper is amazing and would definitely be my first choice. Because I stamped on watercolor paper, I used my stamping platform so that I could get a solid image. I heat set that with my heat tool.

I started by coloring the largest and smallest flowers with Soft Peach 1. This will create a highlight color.

I then went in with Soft Peach 2 not going all the way to the edges of the petals. This is the main color of our petals.

Next I used Rose Pink in the crevices and shadows to create depth.

I used the blender to soften the edges and blend out the colors a bit. (check out the video tutorial to see how I accomplished this)

For the other two blooms I used the same colors in the same order but added burgundy at the darkest points. I blended from the lighter end of the petals inward.

I used lime and olive greens for the leaves and cool aqua for the background. .

To see how I colored these and finished out the card, check out my YouTube video

Supplies for this card:
Karin markers- Soft Peach 1, Soft Peach 2, Rose Pink, Burgundy, Lime Green, Olive Green, Cool Aqua, Blender
Black twine
Enamel dots
| Item | Price | Qty | Total | |
|---|---|---|---|---|
| Subtotal |
$ 0.00 |
|||
| Shipping | ||||
| Total | ||||
Comments
Leave a comment